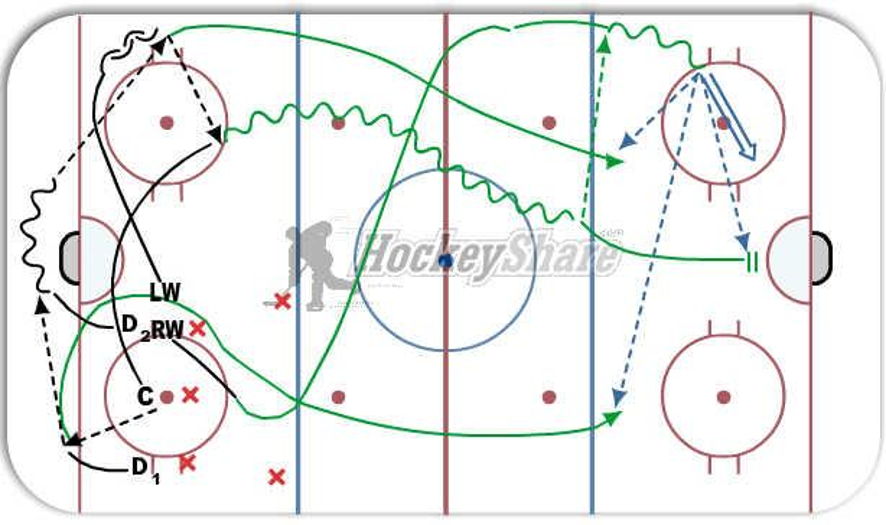
Defensive Zone Faceoff - Breakout to Weak Side
This drill was created using HockeyShare.com's Online Drill Drawing & Practice Planning Platform.
Description
Defensive Zone Faceoff - We win back.
Board-side D1 recovers puck and makes quick pass to D2 near the net. Important that the D2 near the net doesn't get ahead of the play.
LW reads that we have won the draw and gets to far wall
D2 passes to LW and breakout starts. LW can bump to Centre, or pass up to RW who has read the play and left the zone.
RW initially comes-thru the faceoff circle to cover the boardside D in the event that the other team wins the draw. When he sees that we have control he leaves the zone to help pull their d-men off the blue line. If RW is open, then the LW or Centre can feed him with a stretch pass.
The board-side D1 will move towards front of our net, then seeing we have control can join in the rush staying outside the dots-line.
There are many ways to pass and/or carry the puck thru the neutral zone. Once we hit their blueline, we want to move the puck to the outside, and then drive the middle lane to the net. This will cause their d-men to collapse to their net.
The winger with the puck along the wall can now shoot or pass.
The green lines show routes after we have control of the breakout.
Notes: Start drill from faceoff position and work thru with no pressure. Gradually add pressure from coaches or players.
 |