Breakout Drill with Full Ice Shot on Net

Description
Diagram 1 - Top-Down Breakout Pass:
F's start at blue line along the wall for a "top-down" breakout pattern.
1. D to D pass, then D passes stick-to-stick up to F who takes a couple strides in from the blue line.
2. F receives pass and goes 1v0 on the goalie at the far end.
3. Repeats again with D to D to F
4. Repeat again with D to D to Center
5. Repeat again with D to D to F, then D follows up for a return pass, and then goes 1v0 on the goalie.
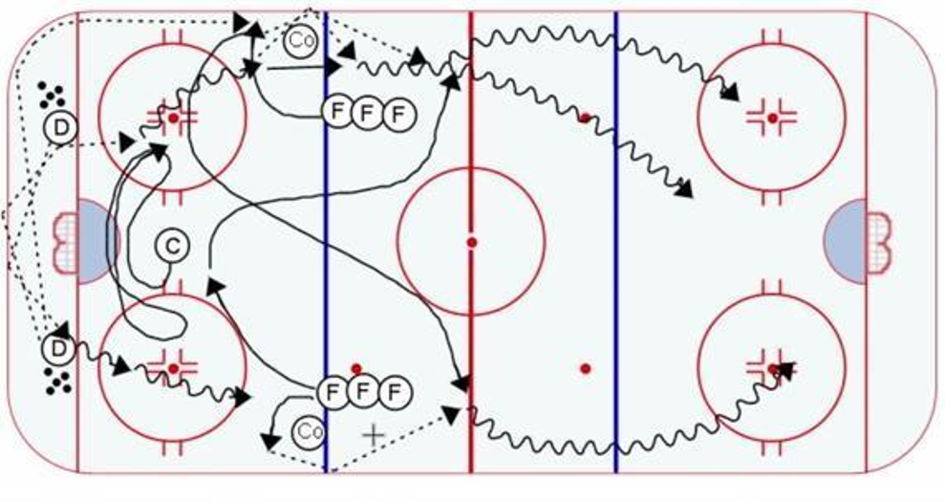
Diagram 2 - Rim Pass with chip past the pinching D
1. F's line up on the blue line, but at the face-off dot.
2. Coach positions himself as a defender, but plays passively.
3. D-to-D pass, then D makes a rim pass.
4. F drops down to play the rim pass, and chips it past the pinching defender (coach).
5. F from the other line reads the play, and skates across to pick up the chip, then he goes 1v0 on opposite goalie.
6. Repeat to the other side.
7. Repeat D-to-D pass and then pass to centre. Centre skates up towards the coach, and makes a chip past around the coach, and recovers his own chip.
8. Repeat D-to-D pass and then D skates up towards coach and makes chip past around the coach, recovers his own chip, and goes 1v0 on goalie.
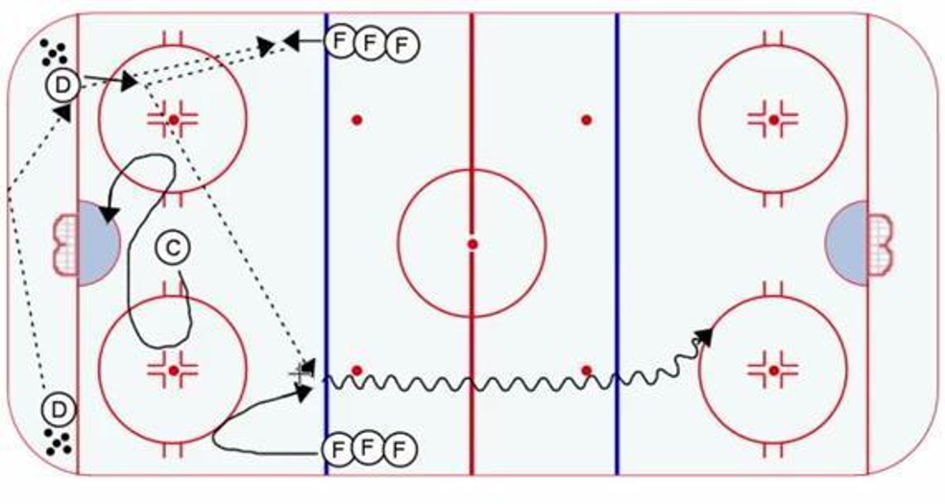
Diagram 3 - Cross-ice Breakout Pass
1. D-to-D pass, then D passes up to F.
2. F has taken a couple strides in to receive the pass, and then one-touches it back to D
3. D immediately passes across the ice to the weak-side F who has skated in a pattern to be a good option. F then goes 1v0 on goalie.
4. Repeat to the other side.
5. Repeat with D-to-D to F who then one-touches back to center. Centre then goes 1v0 on goalie.
6. Repeat with D-to-D to F then back to D. Then D goes 1v0 on goalie.
Notes: Centre is going side-to-side in a low support position.
Options:
1. Position defencemen in the neutral zone to turn the 1v0 into 1v1's.
2. In diagram 1, the F's can skate a bottom-up breakout pattern. Move their line to be in line with the face-off dots.
(Credit goes to Jeremy Weiss for this drill.)
 |