Breakout Alternative 2
Description
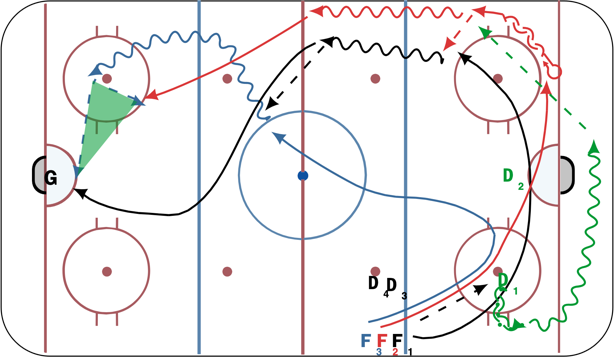
1. F1 in line passes the puck to D, then D curves towards the boards and skates behind the net. F1 curls down low and performs an inside reverse pivot so that facing D for a pass while still moving (it is important that the player always keeps their eyes on the puck. Timing is critical)
* An alternative version of this drill is to have D line up at the redline for a 1-1.
2. F2 Leaves with F1 after passing to D, then D performs the same turn towards the boards and skates behind the net, then makes a pass to F1 or F2. F2 is acting as the centre and curls towards F1 and F1 Makes a one-touch pass to the supporting Center. They both skate up the ice, F2 now drives wide in the offensive zone and F1 drives to the net for a pass or rebound.
* An alternative version of this drill is to have D line up at the red line for a 2-1.
3. F3 leaves at the same time as F1 & F2. F1, F2 & D perform the same route. F3 skates down towards the slot area for protection in case of a defensive zone turnover, and then times their route towards the middle of the ice for a pass from F2 or F3 and skates down the ice. F3 drives wide in the offensive zone, F1 Drives far post and F2 skates into a high slot creating an Attack Triangle.
- An alternative version of this drill is to have one D or two D at the red line to create a 3-1 or 3-2.
- Alternative version: Add a D into the defensive zone where there can be a D-to-D pass behind the net or D1 can make a stretch pass to F1 without going behind the net.
- Can add passive pressure to force D and weak side winger to make a different passing decision.
Tags: FW eyes always on the puck, FW always having stick out in front for a target, Make tape to tape passing, Timing is crucial