Power Play Zone Set Up
Description
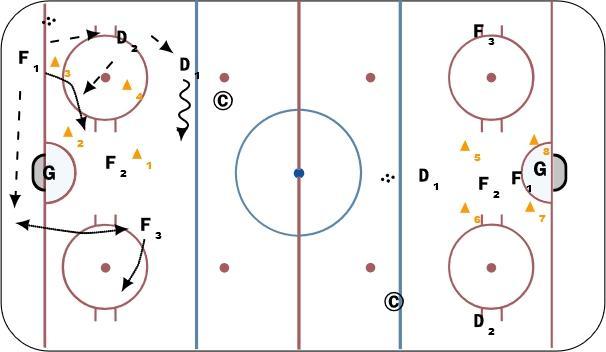
Zone 1 and Zone 2 only drawn to show different options these are not two drills at once. 5 - 0 power play walk through with cones.
Zone 1 (left side) set up is a typical PK formation denoted by cones. Puck Starting down low with F1. F1 is give a few options
1. Pass to D2 and get to the net for a give and go
2. Pass to D2 and D2 feed D1, get to the net and D1 walk to the middle
3. Direct pass up the wall to D1 behind D2, get to the net.
4. Pass behind the net to supporting F3 (if he is there) and slide to front of the net as a back door or stay below goal line as support.
All options are walked through on ice with the coaches and many reps given to players to test out the looks of each option.
Goal is find a way to work the puck up top for a shot and reset from overload set up to 1 3 1.
Secondary goal is show the players what kinds of creative options they have.
Zone 2 right side.
Same as zone 1, walking them through PK options. Puck starts on top in 1 3 1 with D1.
D1 options are:
1. shot
2. bump out to F3 or D2
3. Switch with puck and drop pass with F3 or D2
F2 and F1 to play rebounds and if possession is lost with no goal F2 F2 and one of F3 or D2 to scramble and out number opponent on puck recovery
Key teaching points
- Show the primary look of 1 3 1
- How to reset back into 1 3 1 from overload
- Short passes, lots of support, get shots (max 2 passes)