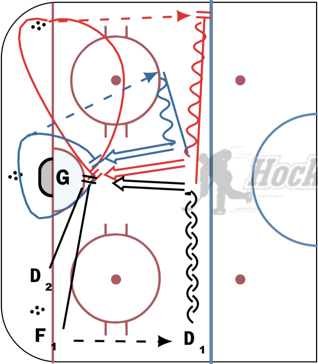
Net Front: 1on1 Battlex3
Description
Time:
12 mins (10 mins work / 2 mins rest & demo)
Goalies: in both nets stopping shots and minimizing rebounds.
Description: D2 will be shadowing and defending against F1 for the entire drill. D2 will allow F1 to complete the first 2 passes without resistance, however the pass coming from behind the net can be challenged. D1 cannot come below the top of the circles/ringette line.
(Black) F1 moves puck up the wall to D1. F1 goes to net front, D1 moves quickly to the middle of the ice and gets a shot on net. F1 tries to deflect shot and find rebound. If rebound is within reach, play it. If it bounces away, move on.
(Red) F1 goes to opposite corner and collects puck, moves it up wall to D1 again. F1 goes back to net front. D1 moves to mid ice again and gets shot on net. F1 tries to deflect and rebound again. Same rules apply.
(Blue) F1 collect puck behind net and needs to get a pass back to D1. D2 can defend the pass but D1 and F1 can move around to get open. F1 cannot leave the goal line until the pass is made, can spin, and go to opposite side to pass. Once D1 receives the pass, they need to get back to mid ice and shoot on net. F1 needs to get to the front of the net and once again deflect and rebound.
Key Points:
Shooting – D1 should be shooting hard and low, looking for a deflection or a screen through legs.
Rebounding – F1 needs to gain position so that they’re able to gain control of space and any available rebounds.
Stick Placement – F1 needs to make sure their stick is present and accounted. It needs to create a target in which the shot can deflect off and onto the net.
Notes: D2 can start without a stick, move on to an upside down stick, and then on to a regular stick.

