Admiral Drill - 3rd progression
Description
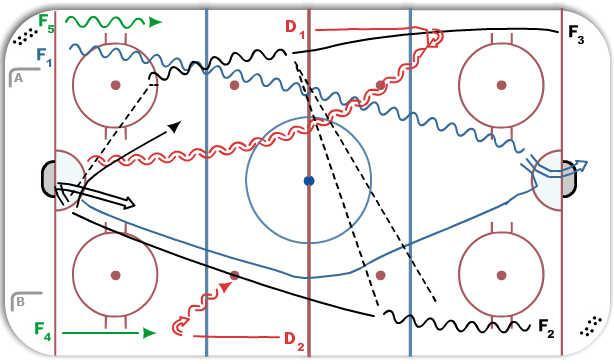
After running two progressions of the Admiral drill (one shooter/one backchecker, then two attackers/one backchecker) next progression is to add defense starting at centre ice.
In the previous progression, all players were split equally between the four corners. Pull out the D and split them in two groups on either side of the rink at centre ice.
If you didn't remove the cones on the last progression, do so now. In this version, the shooter is expected to go hard to the post, deflect/shoot the puck, stop and then backcheck. Use this drill to reinforce good habits, the shooter should never go past the net.
Because the shooter is now going deeper into the zone and will have to do a full stop at the edge of the crease before turning back, this should create a larger gap on the backcheck (counter-balanced by adding D) and require even more effort. It also switches the emphasis to back pressure while skating in the same direction as the attacker.
1) F1 leaves with puck skating full speed down the ice
2) D1 starts skating forward when F1 skates past centre ice, enters zone and takes position at the point
3) F1 shoots on goal, must reach crease before stopping and turning to backcheck
4) F2 & F3 leave as soon as F1 shoots, with F2 carrying puck
5) As soon as F2 & F3 start the attack, D1 pivots and skates backward, moving toward the middle of the ice to defend the 2 on 1
6) F1 turns and pursues F2, applying back pressure that will force F2 to skate hard and execute well on stickhandling/passing
7) F2 passes to F3 after exiting zone, bearing in mind the back pressure coming from F1
8) F2 now skates in a straight line to the post (watching F3 to ensure the play stays onside)
9) F1 chases F2 right to the net, getting in the passing lane and/or tying up F2's stick if possible
10) D1 reads situation: if F1 catches F2, D1 can overplay the puck carrier (F3); otherwise D1 must continue to play it as a 2 on 1
11) after F3 gains offensive zone, adjust speed/direction to time the pass for the moment F2 reaches the far post (another option is to shoot for the goalie's pad to create a rebound opportunity). After making the pass, F3 goes to corner A
12) As F2 & F3 skate over centre ice, D2 follows them into the zone and takes position at the point
13) F4 & F5 leave as soon as F3 passes, with F5 carrying puck
14) D2 pivots and skates backwards to defend the 2 on 1
15) F2 deflects or shoots the puck, then stops and chases F5 on the backcheck
16) F1 goes to corner B, D1 returns to centre ice
17) Drill continues in this cycle
18) at both ends of the rink, the second attacker ((ie, not the shooter) stays on same side of ice when they end their rep and return to the corner, and the backchecker returns to the other side (ie, the side the shooter was on).
Notes: I'm even less sure of what Kevin had in mind when he mentioned that there was a further progression that added in D, so I'm open to suggestions/corrections from anybody with more coaching experience than I have.
Tags: -Full Speed Puck Control & Shooting, -Backchecking, -Conditioning