Triangle and 1 Penalty Kill
This drill was created using HockeyShare.com's Online Drill Drawing & Practice Planning Platform.
Description
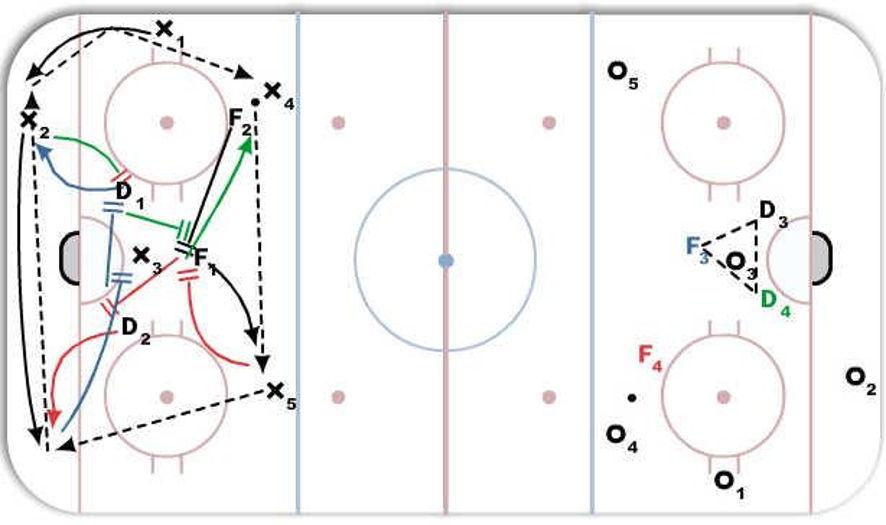
Right side basic formation:
-F3 and D3 and D4 form a tight triangle
-F4 is outside the triangle and always contains then angles the carrier to the boards.
Left side demonstrates the rotations as the puck moves from X4 to X5 then clockwise on the outside of the defensive zone.
1st rotation (black movement)
puck moves from X4 to X5
-F1 rotates to the puck from the top of the triangle, he angles the play to take the D to D pass away and force X5 down the wall
-F2 falls back to the top of the triangle
2nd rotation (red movement)
puck moves from X5 down to X2
-D2 contains X2 and angles
-F2 rotates down into the vacated spot of D2
-F1 returns to the top of the triangle
3rd rotation (blue movement)
puck moves from one corner to the other: X2 to X1
-D1 goes to the corner:contain and angle up ice along boards
-F2 rotates across the crease to the near post
-D2 rotates back to their original position
4th rotation (green movement)
puck is banked back up to the point: X1 to X4
-F1 moves from the top of the triangle to the point X4
-F2 rotates from D1's position to the top of the triangle
-D1 rotates from the corner back into original position
Notes: NOTE: This penalty kill is very effective against powerplays that like to work low and against teams with poor point shots. This is a more passive penalty kill that works very well Bantam and below. The rotations are fairly simple in this penalty kill and you have a very good presence in front of your own net. However, if the triangle separates your team will become vulnerable in front of the net. Emphasize containment over aggression and your team will be less apt to have players rush out of position. In addition, it is very important that players skate hard back into the triangle and rest then rather than taking their time to rotate back into position in the triangle.
 |