Forecheck: Sheep Dog
Description
*Forechecking forwards need to attack with speed and intent.
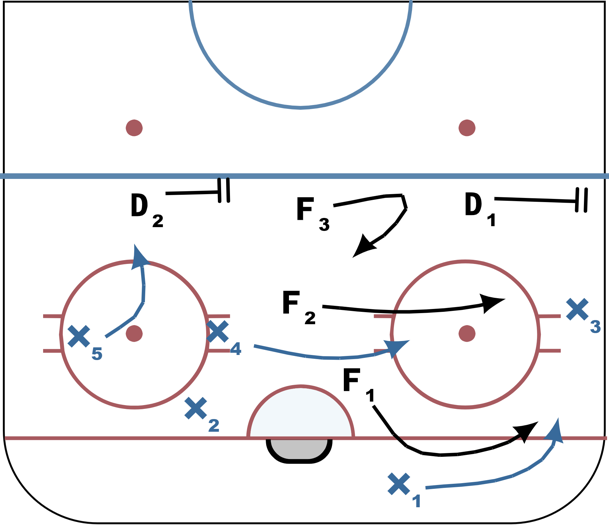
Diagram 1:
If X1 picks up the puck and tries to skate it up the strong side, F1 will push and stay with X1.
F2 will filter over and be able to either attack X3 along the wall or create a block for an outlet pass from X1 to either X3 or X4 (swinging centre).
F3 moves over slightly towards the dot and reads the play as the high guy down the middle, ready to stop a pass or attack on a loose puck or a turnover pass.
D1 seals the wall and blue line, D2 moves over slightly and pick up X5 if they stretch.
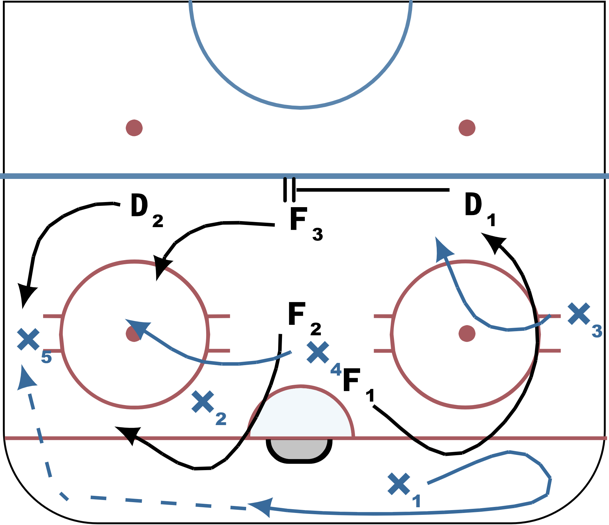
Diagram 2:
If X1 turns w/puck and skates out the other side behind the net.
F1 spins up the wall as a weak side cover on X3.
F2 anticipates the spin and skate and jumps down to forecheck X1, either forcing contact and potential turnover or forcing the pass to X5 on the half wall. If the pass happens then F2 will apply pressure to X5 to move the puck quickly or contact and create turnover, while also shoulder checking for X4's swing.
D2 seals the wall if X1 skates and doesn't pass. But if D2 can anticipate the pass to X5, D2 can pinch up the wall to intercept or seal off the forward in a board battle for the puck; but must do so with speed and intent as getting caught in limbo is not an option.
F3 moves across the blue line to create the cover for D2 if they are pinching down. If D2 isn't pinching then F3 can slide down to create the block as the high forward, stopping the cross ice pass and keying on X4 (centre who is swinging).
D1 moves over and takes away middle of the ice and able to go to open pucks on either side if chipped out.
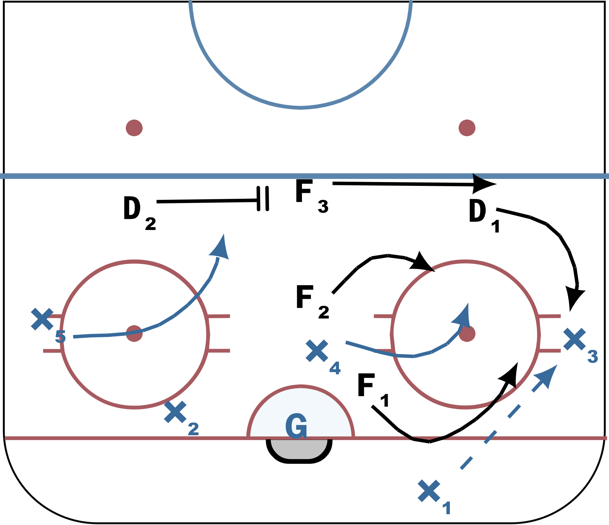
Diagram 3:
If X1 passes to X3, this will be played similar to Diagram 1 but with a few changes.
D1 will pinch down the wall quickly to create panic for X3, forcing a play.
F3 will move over and seal the wall for D1.
D2 will still move over slightly and pick up X5 stretching while covering the middle ice at the BL.
F1 will spin up and put pressure on X3, but also stick blocking the middle pass and shoulder checking for X4.
F2 will step back and assume the high forward position, blocking the cross ice pass and also watching, ready to check X4 if the middle pass comes through, also ready for the turnover and attack.
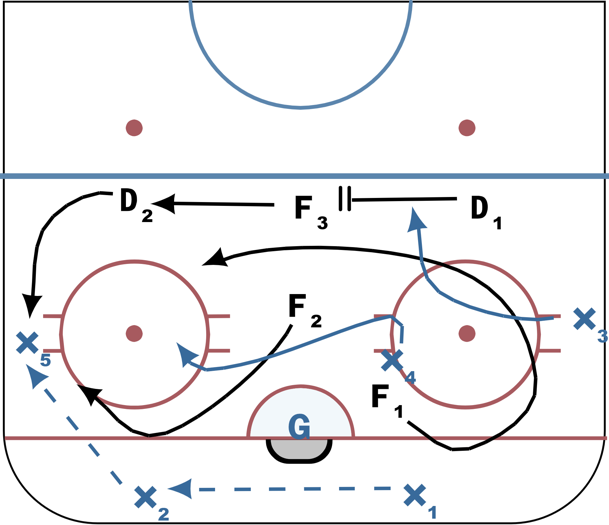
Diagram 4:
If X1 goes D2D with X2
F2 will force the play with X2, either creating an outlet pass to X5 or contact and a turnover from X2. If the pass happens, F2 will spin up wall and put pressure on X5 and blocking middle pass to X4.
D2 will pinch down the wall quickly.
F3 will seal the wall.
D1 will move over covering the middle and weak side forward X3.
F1 will have spun up after original pressure and then circles back to the the high forward, covering for F3 and sealing the middle of the ice for possible cross passes.
*All forwards who swing down to create pressure, need to spin up with intent and speed so that if needed they can become a full speed back checker or simply become the new high forward.
 |