This drill is currently in the trash and scheduled to be deleted soon
D to D with Point shots
This drill was created using HockeyShare.com's Online Drill Drawing & Practice Planning Platform.
Description
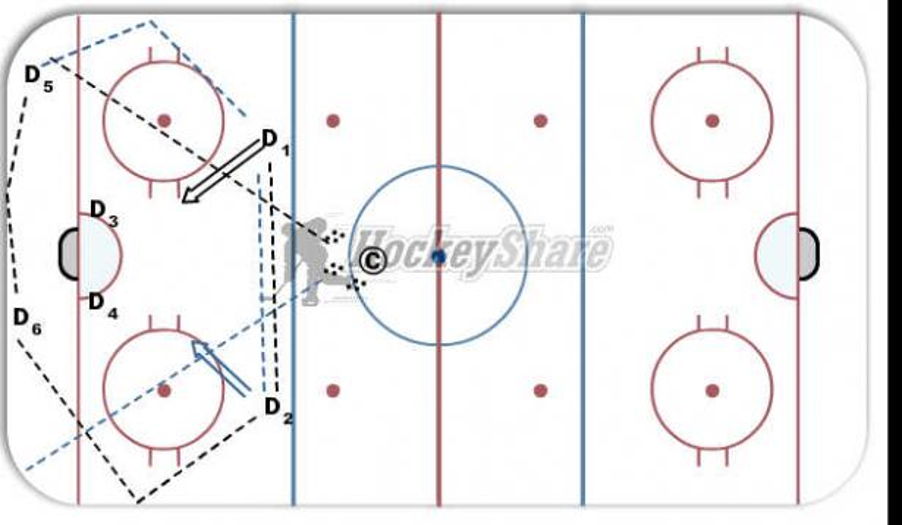
1. (C) dumps puck into corner to D5 area.
2. D5 bank pass (or straight) to D6. D6 bank pass to D2 on point.
3. D2 passes to D1 for shot. D3 and D4 simulate defense on posts and clear loose puck/rebound to sides.
4. (C) shoots puck in opposite corner, repeat drill (blue lines).
5. D1/D2 move behind net, D3 and D4 move to point, D5 and D6 move in front of net.
6. Rotate so everyone is in all positions at least twice. D can swtich sides (on wing/off wing).
Notes: Crisp passes, move quick on passes and rotations. Feet and sticks ready all the time, follow puck path. D behind net can skate a little with puck before bank passes.
Category: Shooting
Tags: Good bank D to D points behind net (simulate breakout), good D to D passes on point (catch and shoot or one-timers).
Posted By: NeilMacKenzie
(Used in 4 Plans)
Created: 2011-12-15, Last Modified 2013-06-03
 |