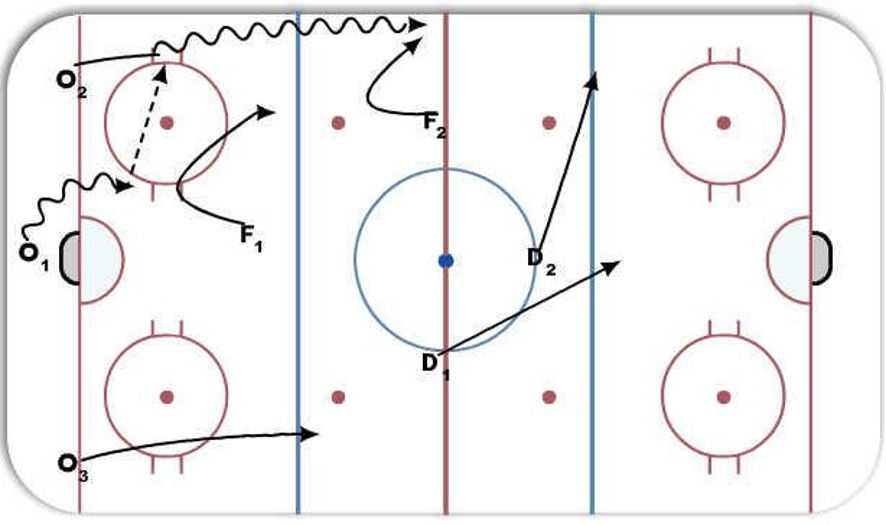
PK Diamond Forecheck

This drill was created using HockeyShare.com's Online Drill Drawing & Practice Planning Platform.
Description
F1 - Starts Just inside Blueline
F2 - Starts on Redline inline with Face-off Dots
D1 - Starts on Redline inline with Face-off Dots Opposite of F2 (Read off of F2)
D2 - Starts on Bottom of Center ice circle
F1 - Forces puck to one side or the other. Then Swings and prevents any pass through the middle while squeezing the play up the wall.
F2 - Takes an inside-out angle and squeezes the puck carrier against the boards. The goal is to force a dump or create a turnover. Worst case they gain the blueline where we are in a good defensive position.
D2 - Retreats back in a Defensive position on the strong side to retrieve a turnover or a dumped puck. If they gain the zone he pressures the puck carrier.
D1 - Is the weak side and comes back into the middle of the ice. Responsibilities depend on what happens with the puck. May have to retrieve a dumped puck, pick up loose pucks or defend.
Notes: * F2 & D1 roles are interchangeable depending on which side of the ice F1 forces the puck carrier to.
** D2 is also responsible if they stretch a forward to our Blueline.
