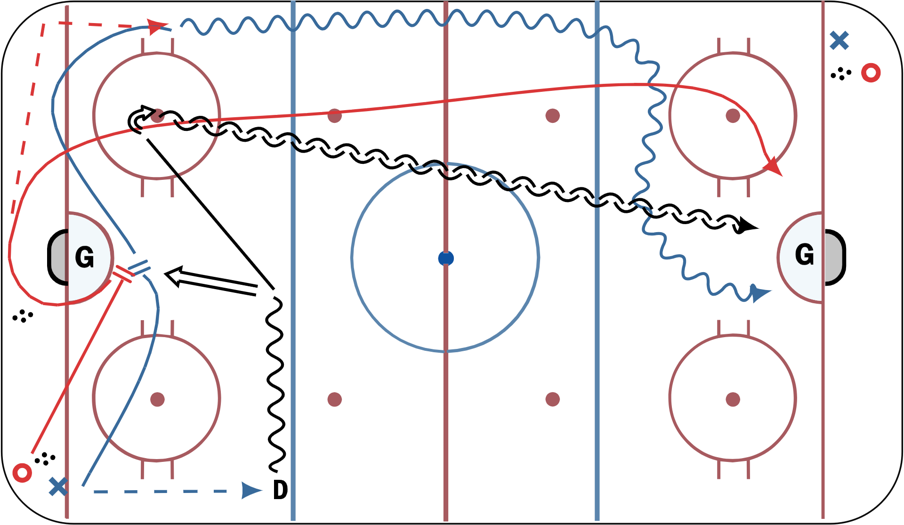
Net Front: Screen Shot 2on1
This drill was created using HockeyShare.com's Online Drill Drawing & Practice Planning Platform.
Description
*Drill runs from both ends.
Part 1:
-Plyr X passes up wall to plyr D, then skates to the top of the crease.
-Plyr O skates with X and tries to move X from the front of the net.
-Plyr D skates to middle and shoots on net.
-If there's a quick rebound it can be played.
Part 2:
-Plyr O skates behind net, grabbing puck and throwing rim pass to Plyr X.
-Plyr X skates to far corner and circles up to "half wall" and receives a rim pass from Plyr O.
-Plyr D skates up to zone circle and pivots backwards to defend a 2on1 from Plyrs X & O.
-Plyr X skates up the wall and cuts to the middle, drop passes to plyr O, and creates a pick/screen. Then drives to the net for a rebound.
*Screen/Pick can be:
a stick pick/pull on the dman
a light pick and roll off on the far side
a full ride and stop bump off
-Plyr O collects the drop pass from plyr X and either passes or gets a shot on net and drives net for a rebound.
Notes: Progression:
After 2on1 players can compete 3on3.
 |